HTML Tables
HTML tables are used to show grid layout on the webpage. Tables have been used to float an image, to separate the page in columns but to layout whole webpages. So far we learned simple HTML tags but we need to nest more tags to build a table: many rows and cells.
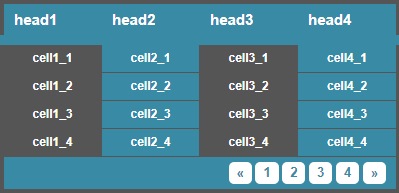
Custom design created with the online table styler.
The source of very basic 2x2 HTML table will look like this:
<table> <tbody> <tr> <td>1</td> <td>2</td> </tr> <tr> <td>3</td> <td>4</td> </tr> </tbody> </table> |
This renders like this on the page:
|
We used the following tags to build this structure:
| table | – wraps the whole table |
| tbody | – the body |
| tr | – row |
| td | – cell |
HTML Table Generator
The good news is that you don't have to write such code because the online table generator will create the code for you. You just have to select the desired size and optionally set additional settings.
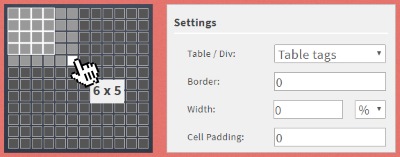
Visit the DivTable.com HTML table generator to create grids or to convert them to div elements.
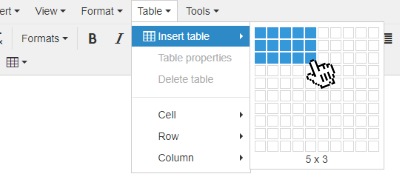
Most web publishers use the online HTML editor which has a very useful table creator that works very similar. Select the Table menu to create new or customize existing tables:
Webpage Layout Using HTML Table
Before the era of responsive web design they used HTML tables to build whole page layouts. This practice is no longer working because on narrow mobile devices the various page sections need to be stacked.
We are going to build such a template using HTML tables to demonstrate a slightly more complicated example.
<table cellpadding="20">
  <caption>HTML Tutorial</caption>
  <thead>
    <tr>
      <td>Logo</td>
      <td>Header</td>
      <td>Icons</td>
    </tr>
  </thead>
  <tfoot>
    <tr>
      <td colspan="2">Footer</td>
      <td>Contact</td>
    </tr>
  </tfoot>
  <tbody>
    <tr>
      <td colspan="2">Title</td>
      <td rowspan="2">Sidebar</td>
    </tr>
    <tr>
      <td colspan="2">
        Content <br />
        comes <br />
        here
      </td>
    </tr>
  </tbody>
</table>
The code will render like this on the page (with a little CSS styling).
| Logo | Header | Icons |
| Footer | Contact | |
| Title | Sidebar | |
| Content comes here |
||
You can notice new tags and attributes which will be explained though this example.
Caption
The caption is an optional tag which displayed above the table and it must be declared immediately after the opening table tag. There can be only one caption assigned and by default it will be aligned centered above the table. The basic look can be overwritten with CSS.
Header
The table head is declared through the thead tag. This can be useful when a table spans through many pages and you want to assigned a fixed position to the header
Body
The main part of the table where more rows can be added is declared with the tbody tag.
Footer
The footer will be rendered at the bottom of the table, even if it's located right after the header in the source.
Colspan and Rowspan
We can set cells to span through more than one cell horizontally or vertically setting these parameters
Use DIVs instead
Nowadays in the era of mobile websites the sections of the websites need to suit narrow screens too and various sections of the page need to be stacked, which is not possible with HTML tables.
This is why it's recommended to use div tags instead of tables and style them accordingly. Go to DivTable.com to convert your existing tables to div elements. This great online tool will help you create stylesheets for div tables.